 |
| Story Of A Commitment: A Mecha (Part I: The Study) |
Hello,
As I am sure you know it now, One Shot has been released!
I heard and read many good and nice comments or critics about this very model, and that is a very good feeling.
For that, I want to thanks everyone. Thank You.
You are encouraging me to continue in the way I've chosen: pushing further, getting better quality, expressing better myself, my views in my sculpting!
I am grateful as getting One Shot entire model done wasn't an easy path as you will see, and now it's time to share my journey with you.
So here starts a Story of a Commitment, a Story of a Mecha.
As I wrote in a previous post, I was contacted in 2009 by John Cadice, Owner and Creative Director at Soda Pop Miniatures, about starting a new kind of miniatures range: Mechas and Characters inspired by Japan culture —Mangas— mixed with a more traditional/fantasy style.
A pretty exciting challenge with great possibilites!
At the same moment, HellDorado project was shut down by Asmodée as for the creative studio I was working for with JAG, Thomas David and Bertrand Benoît.
The perfect timeline!
After connecting my fellow sculptors with John, it was time to get my hands dirty!
As I was the first to start the range, my work was going to be a reference. I had to be sure about expectations, my approach and the result for the rest of the range would follow it as basis/parameters... well, as I already wrote: the reference.
 |
| One Shot Concept Art (click to enlarge picture) |
John sent me a concept art, rather an illustration, of One Shot.
First One Shot posing on the Mecha, then details and One Shot standing up.
Very exciting, isn't she?
I already had a long experience, in different types of miniature sculpting, for different types of production, but I never did this particuliar type of design.
And I am not reallly fond of war vehicule or other kind of plastic models, any kind of "maquettes" as we say in French.
So, exciting but also very new.
First of all, define the production type and the scale.
John wanted a metal production, obviously because it's more efficient than resin castings, but also because he is a player/fan of metal game miniatures, and surely wanted to reach this type of customers.
I wasn't qualified for designing the model for plastic production via 3D computing, and he confirmed me that wasn't an option at this stage.
So, I started the study of the model for metal casting.
About the scale, several questions: size of the Mecha, of the Character, of the final model and of course the possible compatibilty with the other ranges already on the market.
I then started 2 different studies:
-The Mecha itself, different scales being not a real problem for the design
-The scale, reaching the right final volume, model and the right product all together.
Designing a Mecha: Engineering?
Goal: to define the different parts/cuts of the Mecha for production and a right assemblage.
I started my analyzing work by identifying the different single elements and "production blocs".
Then, from the original concept art, I took measurements and compared the different identified elements/blocs.
Once everything was defined, it was time to properly design them with the pencil!
I used blue graph tracing paper for each element, then could put all of them in one only design.
I started by Mecha's profile: legs, pelvis and cockpit.
The actual designs are not about the production blocs/parts, but will help for the sculpting stage.
 |
| Mecha's Elements Profile Designs (click to enlarge picture) |
 |
| Mecha's Profile Designs (click to enlarge picture) |
Later on, I did the same with a front view of the cockpit.
 |
| Mecha's Cockpit Elements Front View Designs (click to enlarge picture) |
After scanning all these designs, they were cleaned, blue graphics eliminated to get clean lines and a proper design.
 |
| Mecha's Leg Designs Cleaned (click to enlarge picture) |
 |
| Mecha's Cockpit Designs Cleaned (click to enlarge picture) |
 |
| Mecha's Profile Designs Cleaned (click to enlarge picture) |
 |
| Mecha's Cockpit Elements Designs Cleaned (click to enlarge picture) |
I also assembled cleaned designs of the different elements of the front view cockpit.
 |
| Mecha's Cockpit Front View Designs Cleaned (click to enlarge picture) |
Sometimes, and even if your studies are deep and complete, you may forget a parameter, or be wrong about an interpretation.
Here, I had two options for left arm's attach, wasn't sure about the proper sculpted model which would be the right necessary one.
(Actually, it's the second one.)

Designs are only black lines on white page and coloring it helps to see the whole shape better, even to see the volumes (though I did not really managed the lighting)...

Designs are only black lines on white page and coloring it helps to see the whole shape better, even to see the volumes (though I did not really managed the lighting)...
 |
| Mecha's Colored Designs (Click to enlarge picture) |
At this stage, I was very happy with my studies so far, and John as well!!!!
Validated!
Scaling a Mecha: a right responsability.
Goal: to obtain a good balance between thickness, volume, manufaturing and... a whole range to come!
Using original concept art and John's guidelines, I defined different scales from the Mecha size or Pilot size for instance.
At the end, two options was still possible: the actual Pilot eyes would be at 32mm (meaning the girl would be 30mm tall at eyes as she's wearing big soles) or the Mecha would fully stand on a 50mm diameter base.
I then established a real sized comparative designs document for John to decide the final size of the model... and the range!
My own opinion was to go for the smaller one, as usual gaming miniatures ranges are about 28-32mm, that we would fit exactly; the bigger scale meaning 35mm at eyes for the pilot, and then, the rest of the range.
Goal: to obtain a good balance between thickness, volume, manufaturing and... a whole range to come!
Using original concept art and John's guidelines, I defined different scales from the Mecha size or Pilot size for instance.
At the end, two options was still possible: the actual Pilot eyes would be at 32mm (meaning the girl would be 30mm tall at eyes as she's wearing big soles) or the Mecha would fully stand on a 50mm diameter base.
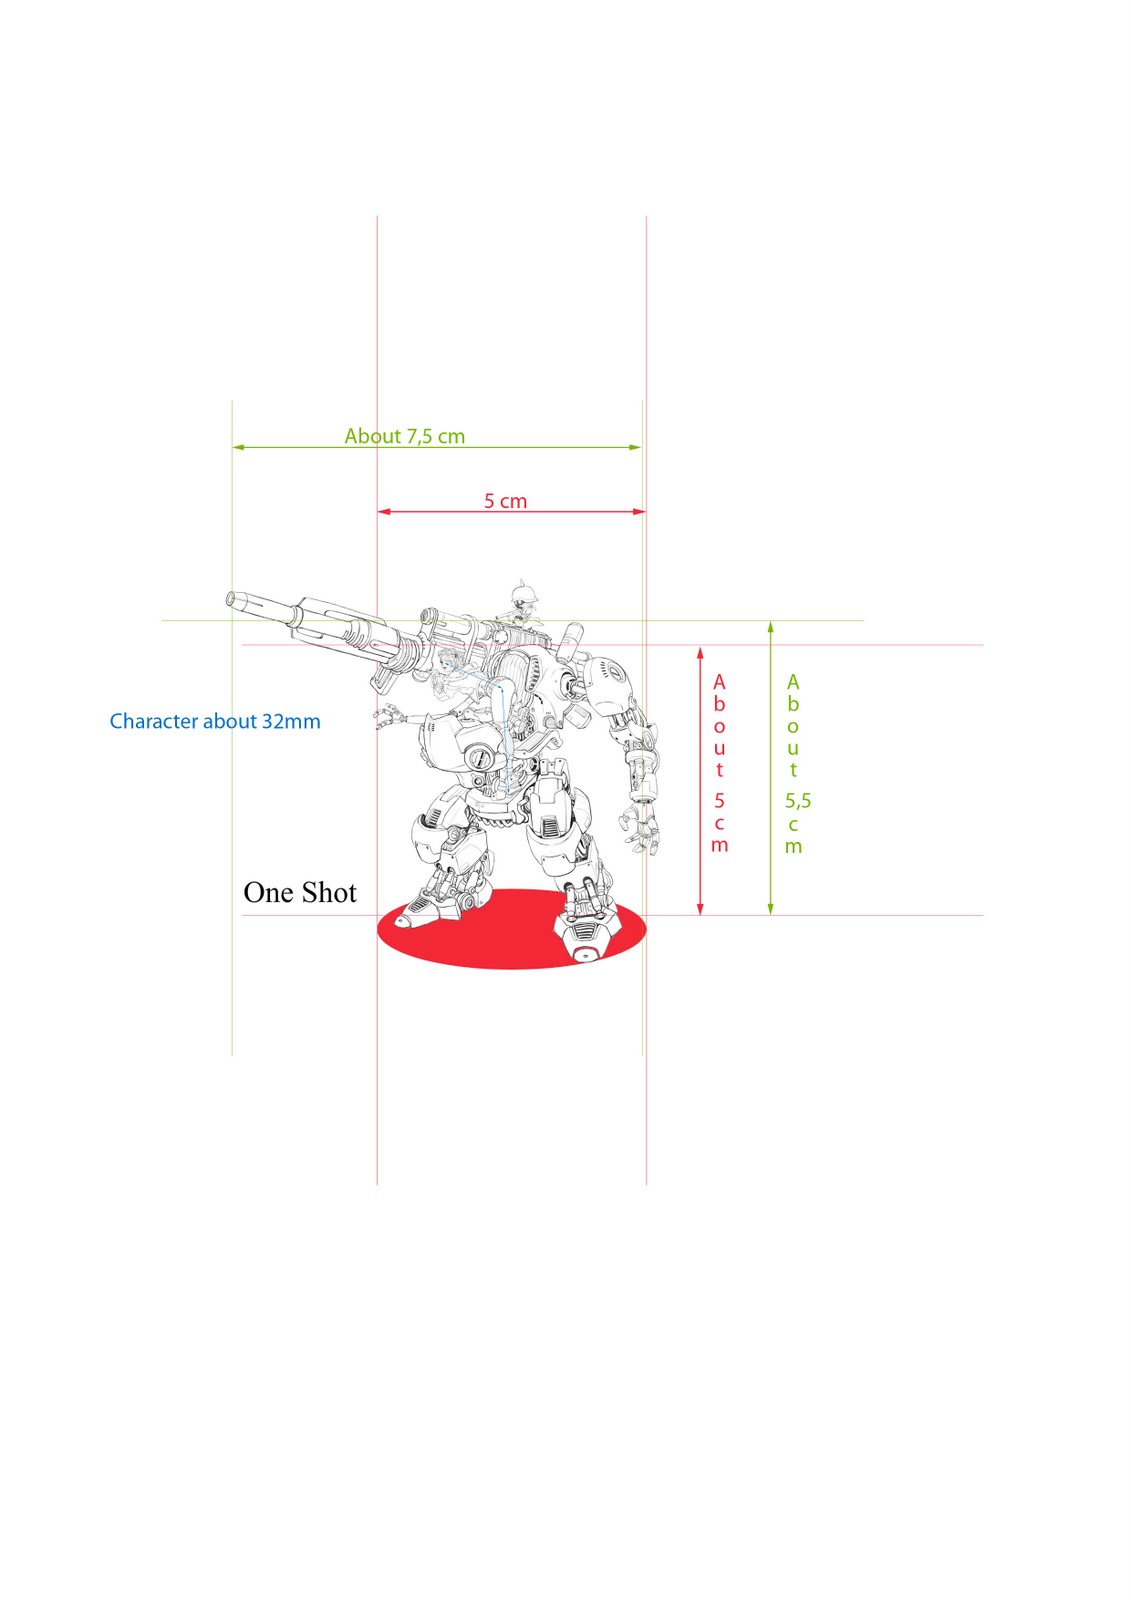 |
| Pilot 32mm Scaled Design (Click to enlarge picture) |
 |
| Mecha Base 50mm Scaled Design (Click to enlarge picture) |
I then established a real sized comparative designs document for John to decide the final size of the model... and the range!
My own opinion was to go for the smaller one, as usual gaming miniatures ranges are about 28-32mm, that we would fit exactly; the bigger scale meaning 35mm at eyes for the pilot, and then, the rest of the range.
 |
| One Shot Comparative Scales (Click to enlarge picture) |
And... the range would officially be a 30mm metal miniatures range to come!
And this long work of studies would be a good start for the next projects...
My fellow sculptors, JAG and Thomas, would be able from now to start new Soda Pop projects from these studies, and more, John would provide us more pre-studied designs for Mechas, to avoid this long stage...
 |
| One Shot Real Size 02 (Click to enlarge picture) |
I then rescaled my own designs for fitting this Pilot scale, adapting and adding the canon from original concept art, confirming with John this choice.
 |
| One Shot Real Size 01 (Click to enlarge picture) |
 |
| One Shot Elements Real Size 01 (Click to enlarge picture) |
 |
| One Shot Elements Real Size 02 (Click to enlarge picture) |
 |
| One Shot Elements Real Size 03 (Click to enlarge picture) |
I then printed each pages of these elements as a scaled reference for the sculpting to come.
But this will be for the next episode!
Soon: Story Of A Commitment: A Mecha (Part II: The Making)...
I hope you enjoyed this article about how some nice designs would become long and hard project, about how after years of experience, it's still possible to completely discover new ways of working.
See you soon,
M.

5 comments:
Tu as pas un peu fait le boulot du designer non ?
C'est pas au dessinateur de se bouger le fion pour te fournir des vus exploitables ?
Oui, tu as raison.
D'ailleurs, par la suite, les designs des Méchas ont pris en compte ces aspects, même si ce n'était pas aussi poussé...
C'était une première pour Soda Pop comme pour moi, avec les oublis, les approximations, voire les erreurs que cela implique...
Une belle leçon.
M.
Brillliant, i will share this!
it was a pleasure to paint!
Yeah?
I'm very glad!
Will you post pics soon? Let us know!
M.
I did the box art for soda pop :)
Pic's are on our site golempaintingstudio.co.uk and
facebook
coolminiornot.com
Click on my name for the link :)
Rock on!
Post a Comment