 |
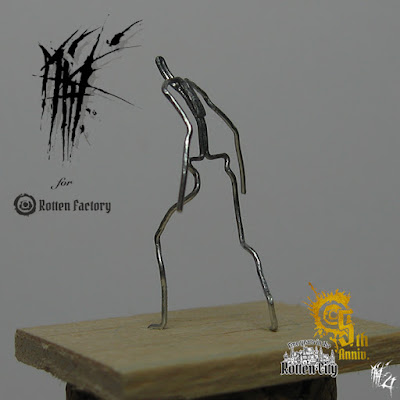
| Rotten Clown — Armature. (Click on to enlarge) |
Welcome back in the Part 2 of the Tale of the Creation of the Rotten Clown for the KickStarter Campaign of the 5th anniversary of the Rotten Factory...
Who called me Dr Frankenstein ?!!
⎯
(Vous pouvez vouloir commencer ce conte par la Partie 1 : First Contact (Premier Contact).)
⎯
 |
| Pliers & Wire. (Click on to enlarge) |
And this means creating a skeleton that will support the hideous anatomy of the clown but also give already the feeling of power and movement of the character.
Using a 0,7 mm diameter wire, with the help of my pliers, I started by the "base" of the armature : one wire around 10-11 cm long that I folded in 2.
This will represent the head, neck and spine, the top of the folded wire being the eye level.
Then, I fold both sides of the wire to create hips and each leg.
This way, using only one wire for the base of the armature, will allow the skeleton to be strong enough for supporting the Fimo and manipulations to come.
Using a new same diameter wire, I create the armature of the shoulders and arms.
⎯
Et cela signifie créer un squelette qui va supporter l'anatomie hideuse du clown mais aussi donner dès à présent la sensation de puissance et le mouvement du personnage.
Utilisant un fil de fer de 0,7 mm de diamètre, et avec l'aide de ma pince, j'ai débuté la "base" de l'armature : un fil d'environ 10-11 cm de long que j'ai plié en 2.
Il va représenter la tête, le cou et la colonne vertébrale, l'extrémité du fil plié étant le niveau des yeux.
Puis je plie chaque côté du fil de fer pour créer les hanches et jambes.
Cette façon de faire, utilisant un seul fil pour la base de l'armature, permettra au squelette d'être assez solide pour supporter le Fimo et les manipulations à venir.
Utilisant un nouveau fil du même diamètre, je crée l'armature des épaules et des bras.
⎯
Here is the result :
 |
| WIP 01 : Rotten Clown — Armature / 2021. (Click on to enlarge) |
 |
| WIP 02 : Rotten Clown — Armature / 2021. (Click on to enlarge) |
 |
| WIP 03 : Rotten Clown — Armature / 2021. (Click on to enlarge) |
 |
| WIP 04 : Rotten Clown — Armature / 2021. (Click on to enlarge) |
 |
| WIP 05 : Rotten Clown — Armature / 2021. (Click on to enlarge) |
 |
| WIP 06 : Rotten Clown — Armature / 2021. (Click on to enlarge) |
 |
| WIP 07 : Rotten Clown — Armature / 2021. (Click on to enlarge) |
 |
| WIP 08 : Rotten Clown — Armature / 2021. (Click on to enlarge) |
 |
| WIP 09 : Rotten Clown — Armature / 2021. (Click on to enlarge) |
 |
| WIP 10 : Rotten Clown — Armature / 2021. (Click on to enlarge) |
 |
| WIP 11 : Rotten Clown — Armature / 2021. (Click on to enlarge) |
:)
...But that's already the next step of this tale ;)

No comments:
Post a Comment